SL73SL88SL88 GT
User manual## Introduction
Thank you for choosing SL MK2, a new chapter in keyboard controllers. Housed in a stylish and robust cabinet, it is based on a completely new technology and innovative UX Logic user interface derived from Numa X Piano.
The keyboard features Aftertouch control and, together with the programmable Sticks and transport controls, provides total control over the musical performance.
Seamless integration with Numa Player, a built-in pro audio interface and high-definition MIDI 2.0 protocol make this controller unique.

The example above shows how SL MK2 can be used in a typical studio setup.
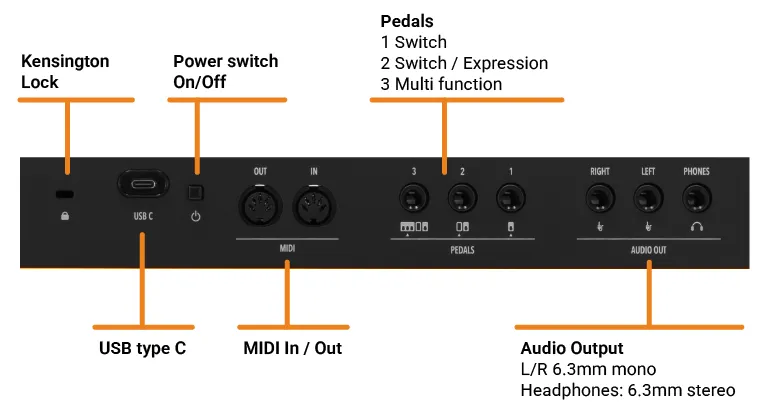
The connections:
- **USB-C port** connected to a computer running a DAW or a standalone software.
- **MIDI In/Out** connected to external devices.
- **L/R** audio outputs connected to active stereo speakers.
- **Phones output** connected to headphones.
- **Pedals 1, 2, 3** connected to switch, switch or expression, and multi-function pedals.
In this setup, the USB connection allows MIDI recording to the computer and audio playback of the virtual instrument to the speakers.
## Power and connection
1. Connect the USB-C port to a power source using the supplied power adapter.
2. Switch on the SL using the power button next to the power plug.
### USB Power
The instrument can also be powered by a connected device, using the supplied cable or a shielded quality certified USB cable.
[Read more about USB connection](/support/articles/1876513/)
Make sure the computer or the mobile device can provide enough power. When possible, avoid using USB hub and adapters.
### USB data
The instrument implements 4 different MIDI ports and 1 *Audio over USB* port:
1. ***SL CTRL*** (Mac) ***SL*** (Win) for standard MIDI in/out controls.
2. ***SL MIDI 2.0*** (Mac only) that enables the new MIDI protocol.
*CTRL* and *MIDI 2.0* ports work in parallel. Select only one of them to avoid doubled notes in your MIDI tracks.
You can also disable the MIDI 2.0 Port in [Global settings](#global-settings).
3. ***SL DAW*** (Mac) ***MIDIIN2-MIDIOUT2*** (Win) for DAW transport buttons (see [DAW mode](#daw-mode)).
Disable this port in standard MIDI inputs in your tracks to avoid listening to MIDI notes when SL is configured as Control Surface and you press transport buttons (Mackie protocol adopts some MIDI note messages for transport controls).
4. ***SL LINK*** (Mac) ***MIDIIN3-MIDIOUT3*** (Win) to enable advanced features with Numa Player and other compatible Apps (see [App Mode](#app-mode)).
5. ***SL AUDIO*** (Mac & Win) to work as Digital Audio Interface with 48 kHz/16 bit output.
Disable this feature to avoid conflicts with other Audio software when you use an external Digital Audio Interface working with different Sampling rate and resolution.
### Pedals
Connect the pedals to the corrsponding sockets, labelled as *PED1*, *PED2* and *PED3*:
- **PED1**: You can connect a switch pedal.
- **PED2**: You can connect either a single switch pedal or a volume/expression pedal.
- **PED3**: You can connect a switch, volume/expression or a [Studiologic SLP3-D](/products/slp3-d/), as explained in the related chapter.
[Read more about pedal compatibility.](/support/articles/1970321/)
### Audio Output
If you wish to use external amplification systems, or record the instrument sounds, connect the Left and Right audio outputs to the inputs of your mixer or amplifier, or to the inputs of your computer audio board, using suitable cables.
Please note that SL is a controller keyboard, so it doesn't have any internal sounds.
However, thanks to the Audio over USB feature, you can route audio data from your computer or other compatible digital device to analog audio output.
### Headphones
The Headphones output can be used with an headphones set or as an additional stereo audio output.
## Panel - display and navigation
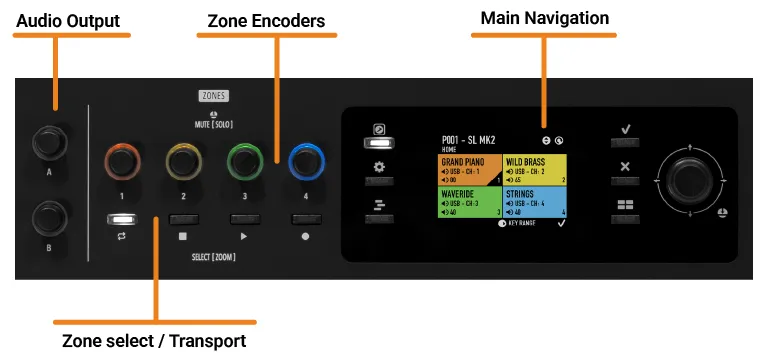
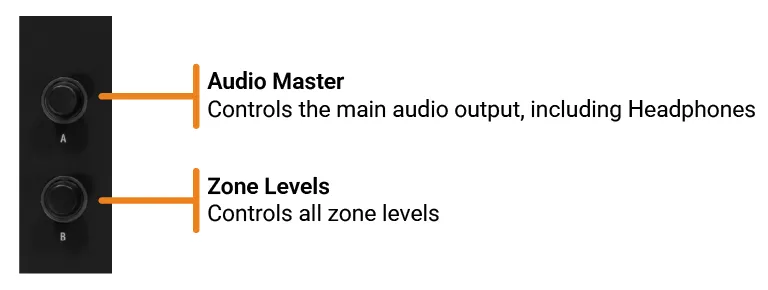
### `A` Knob
Rotate the A knob to adjust or quickly disable the analog audio output of your SL.
### `B` Knob
The B knob is similar to a *Master MIDI Volume*. If you are using more than one Zone, you use this knob to control the volume of all active Zones.
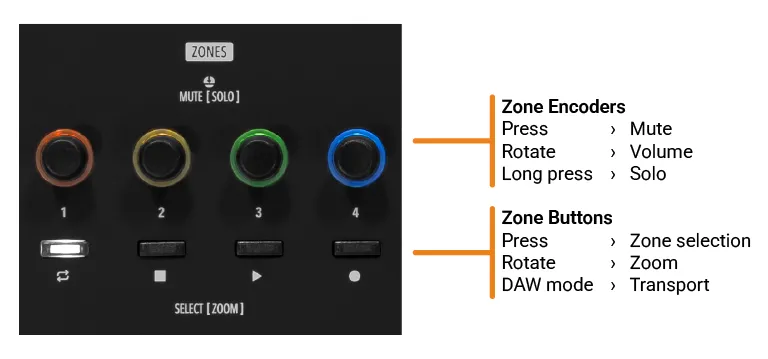
### Zone controls
**Encoders**
- Rotate the zone knobs to adjust the volume of the corresponding zone.
- Press a knob to mute the corresponding zone.
**Buttons**
- Press the buttons to select the corresponding zone.
- Long press the button to enter in Zoom mode and adjust the associated parameters.
- In DAW mode, you can control your DAW: *Select Buttons* become *Transport Buttons*.
### System navigation
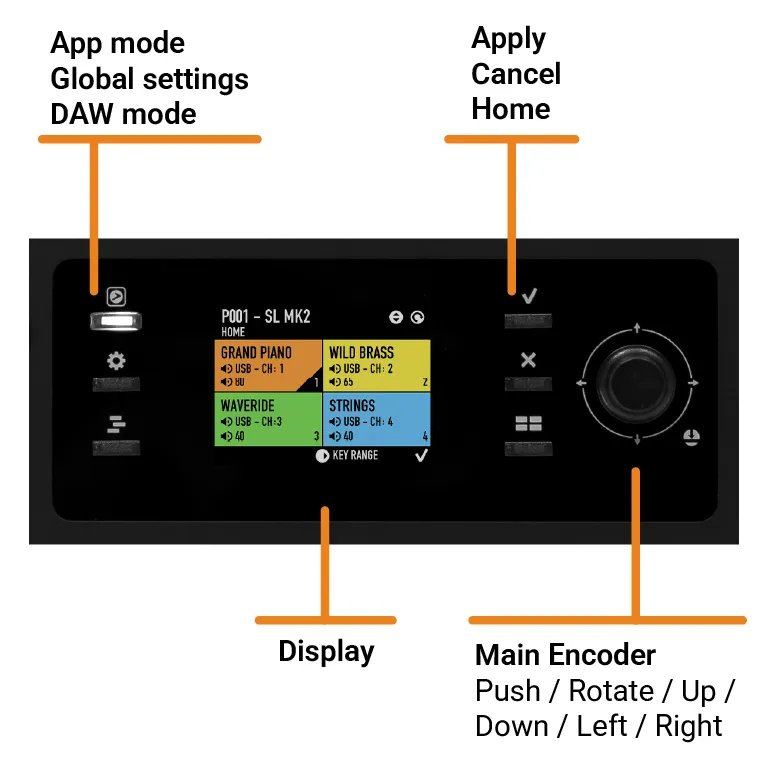
## Programs
SL MK2 is organized in Programs. A Program is based on 4 Zones. Each Program stores all Zone parameters and settings.
A Zone can have 3 different status:
- ON (colored)
- OFF (black)
- MUTE (gray)
The Home screen displays the current Port, Channel and Volume of each Zone.
Press the **Home** Some DAWs require the installation of an additional component.
## App Mode
Press the **App Mode button**
Global settings are automatically saved and are not linked to Programs.
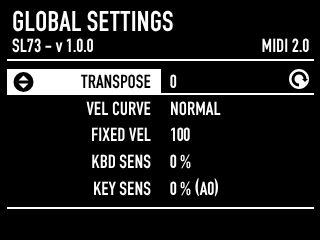
### Firmware version
The page subtitle indicates the installed firmware version.
[Firmware release notes and update procedure](/support/articles/slmk2-firmware/)
### MIDI version
The right side of the screen shows the current MIDI version. SL MK2 automatically sets the MIDI protocol version based on the compatibility with the connected device.
MIDI 2.0 is the latest evolution of the Musical Instrument Digital Interface (MIDI) protocol, designed to provide more expressive and flexible communication between digital musical instruments, software, and other devices. Building on the foundational MIDI 1.0 standard that has been in use since 1984, MIDI 2.0 introduces a number of improvements, including higher velocity resolution, increased control capacity, and better integration with modern technology.
It allows for more nuanced performances and supports new features such as MIDI Capability Inquiry (MIDI-CI), Property Exchange and Universal MIDI Packet (UMP).
Backward compatibility with MIDI 1.0 devices is guaranteed, making it a significant step forward in music production and performance.
### Setting list
Use the Main Encoder **up/down**
Using the Common Channel you can send/receive MIDI parameters (notes, controllers, etc...) in your DAW. | `OFF`, 1-16 | | *UI LAYOUT* | Set the *HOME* view ([see related paragraph](#programs)) | `CLASSIC`, `ZOOM` | | *MERGE IN* | Merge MIDI messages coming from MIDI IN Port (DIN) to a MIDI output. | `OFF`, `USB`, `MIDI OUT (DIN)`, `USB + MIDI OUT (DIN)` | | *USB MIDI MODE* | Set `MIDI 2.0 LOW RES` to disable high-resolution MIDI or `MIDI 1.0` to disable MIDI 2.0 port entirely. This can be useful if you connect devices that are not compatible with MIDI 2.0 messages or to avoid double MIDI messages. | `MIDI 2.0`, `MIDI 2.0 LOW RES`, `MIDI 1.0` | | *USB AUDIO* | Set `OFF` to disable USB audio feature. | `OFF`, `ON` | | *LCD DIMMER* | Adjust the display brightness. | 0-100% in steps of 5 | | *FACTORY RESTORE* | Restore all factory settings.
**Push**
However, thanks to the Audio over USB feature, you can route audio data from your computer or other compatible digital device to analog audio output.
Using the Common Channel you can send/receive MIDI parameters (notes, controllers, etc...) in your DAW. | `OFF`, 1-16 | | *UI LAYOUT* | Set the *HOME* view ([see related paragraph](#programs)) | `CLASSIC`, `ZOOM` | | *MERGE IN* | Merge MIDI messages coming from MIDI IN Port (DIN) to a MIDI output. | `OFF`, `USB`, `MIDI OUT (DIN)`, `USB + MIDI OUT (DIN)` | | *USB MIDI MODE* | Set `MIDI 2.0 LOW RES` to disable high-resolution MIDI or `MIDI 1.0` to disable MIDI 2.0 port entirely. This can be useful if you connect devices that are not compatible with MIDI 2.0 messages or to avoid double MIDI messages. | `MIDI 2.0`, `MIDI 2.0 LOW RES`, `MIDI 1.0` | | *USB AUDIO* | Set `OFF` to disable USB audio feature. | `OFF`, `ON` | | *LCD DIMMER* | Adjust the display brightness. | 0-100% in steps of 5 | | *FACTORY RESTORE* | Restore all factory settings.
**Push**